Making Our iOS Components Accessible
How we improved accessibility to our iOS components and made it inclusive.
By Adwin Ronald Ross
People from all walks of life, of all ages, and from different backgrounds use smartphone apps. Designing apps with accessibility in mind is advantageous for everyone, including people with vision, motor, learning, or hearing disabilities.
Last week, we at Gojek wrote about how we improved accessibility in our Android component. You could check it out here:
Our customers vary in age, gender, tech knowledge, and in ability. When we say we make lives of the people in Southeast Asia better, we intent to be immensely inclusive and accessible.
In this blog, I shall talk about how we analysed commonalities between several components of our Design Language System and wrote accessibility guidelines which should be met before developing new components in iOS.
Accessibility basics in iOS
UIKit provides a large set of UIAccessibility APIs to update accessibility information about an app’s user interface elements. These APIs can be used to set accessibility information, send accessibility notifications, create accessibility containers among many other things. Follow the below steps to update the basic accessibility information of a component:
- Set isAccessibilityElement of the element to true
- Set the required accessibilityTrait for the element
- Set the appropriate accessibilityValue for the element
- Set a accessibilityHint, if required
- Set the accessibilityLabel for the element
And voila, you are done with adding accessibility for a UI element.
The above steps help you set the accessibility for a single element but sometimes you might need to group multiple elements together for the content to make sense.
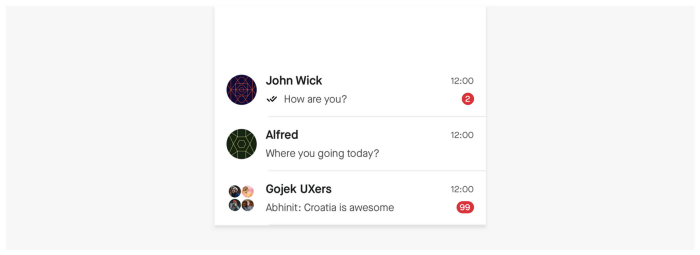
The above example shows the listing page of a chat screen. In the above case, the read icons (double tick) and the notification badge when read out individually will not have any context of their own. You will need to make the cell an accessibility container and add a generalised accessibility for the cell. Check the code snippet below:
cell.isAccessibilityElement = false
cell.accessibilityElements = [nameLabel, messageLabel, timeLabel]
let unreadMessage = notificationLabel.ishidden ? "" : "\(notificationLabel.text) unread messages"
cell.contentView.accessibilityLabel = nameLabel.text + messageLabel.text + "sent at " + timeLabel.text + unreadMessage
In the above example the cell has been converted to an accessibility container which will have an accessibility label of its own. When the user right swipes, the focus will shift to the elements that have been set in the accessibilityElements array. In the above case, the accessibility label for the cell will read out, ‘John Wick How are you? sent at 12:00, 2 unread messages.’
The last important thing that you’ll need to remember while setting accessibility is knowing when and how to use accessibility notifications. Accessibility notifications are mainly used when there is change in UI that the user needs to be intimated about. For example, a screen being changed, an alert being displayed, significant part of the UI being updated, etc. You can send a screenChanged notification when the screen is changed, an announcement notification when a message needs to be conveyed to the user or a layoutChanged notification when a significant amount of the screen is updated. Here’s an example:
UIAccessibility.post(notification: .announcement, argument: "New alert displayed. Email verification pending!")The above snippet will announce the string passed in the argument.
UIAccessibility.post(notification: .layoutChanged, argument: button)
The above snippet will change the focus to whatever element is passed in the arguments.
Accessibility Activation point
While designing the UI, there might be a scenario where there is a descriptive text in a view and an actionable element for the same. If you look at the settings page in iOS, the cell has a UISwitch in accessory view and the cell’s label describes the action for the switch.
In cases like these, it’s recommended the action should be changed from the button to the view that contains the content description. When a UISwitch is added to the cell as its accessoryView, iOS takes care of this feature automatically as shown above. You can implement this yourself by updating the accessibilityActivationPoint property of the view.
accessibilityActivationPoint property is the activation point for the accessibility element in screen coordinates. This means, it’s the point to which the action is sent when the element is double-tapped. The default value for this property is the midpoint of the accessibility element’s frame.
Let’s take our custom alert view as an example. The alert only has a descriptive text and an action button, so when the user double taps on the AlertView, we make sure that the action is sent to the button.
override public func layoutSubviews() {
   super.layoutSubviews()
   self.accessibilityActivationPoint =    self.actionButton.accessibilityActivationPoint
}
So in the above case, we set the accessibility activation point for the view as the accessibility activation point for the button. Always make sure that the accessibilityActivationPoint is updated in layoutSubviews. This is done so that any time the UI is updated, the activation points gets updated as well.
Accessibility Frame
Accessibility frame, like the name suggests, is the frame of the accessibility element, in screen coordinates. One can update the accessibilityFrame property to update the frame of the view that can be interacted with, while voiceover is turned on. In the case of our custom progress bar, the progress bar has a height of 8 points, and when the height of the element is that small, the users cannot access it via touch. To resolved this issue, we updated the accessibilityFrame of the progress bar so that the height is increased to 16 points.
override open func layoutSubviews() {
super.layoutSubviews()
var accessibilityFrame = UIAccessibility.convertToScreenCoordinates(self.frame, in: superview)
// increases the touch area of the progress bar
accessibilityFrame.size.height = 16
// makes sure the the increased height is evenly spread
accessibilityFrame.origin.y = accessibilityFrame.origin.y - 4
self.accessibilityFrame = accessibilityFrame
}
As you can see in the above example, the accessibilityFrame of the progress bar has been updated to increase the height of the progress bar.
TextFields
UITextFields are accessible by default. When the textfield is tapped, the default voiceover implementation is <placeholder> double tap to edit While editing the default voiceover implementation include the content that has been typed, position of the curser and editing status. For eg. if there is a textfield that has the text one inside of it, and is currently being edited, the voiceover will read TextField, is editing, one, insertion point at end
In our case, we have custom textfields that include an info label, an error message, a clear button.
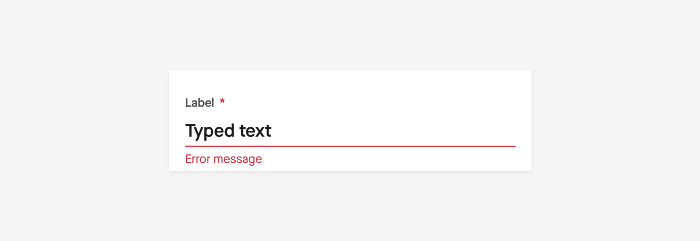
To make this text field, we made use of UIAccessibilityContainer to make the whole view accessible and then make the individual components like the info label, the textField and the error label individually accessible as well.
Another challenging part of text fields is making sure that the OTP text field is accessible. OTP text fields are challenging as they have a timer of 30 seconds after which you can resend the OTP.
To implement accessibility for this we used UIAccessibilityContainer once again. In this case the child accessibility elements include the info label, the textfield and the timer label. For time label, we made sure that it had its accessibilityTraits set to .updatesFrequently. This way the voiceover knows that the label will be updated frequently and will read out its value over time. Also make sure to update the accessibilityLabel for the timer label every time the text is updated.
As we made use of UIStackView to manage the timer label and the retry button, the voiceover automatically shifts the focus to the button when the timer label disappears. You can post a layoutChanged notification if you are not using a stackview.
UIAccessibility.post(notification: .layoutChanged, argument: retryButton)Keyboards
iOS keyboards are accessible by default. But there are certain cases where you might be better off with your own custom keyboard. To add accessibility to a keyboards key, just add the appropriate accessibility labels for the key and set the accessibilityTraits property to .keyboardKey.
Images
In iOS11 and up, voiceover can detect text in images. It also describes the number of faces in the image, the expressions they have, the overall scene and the blurriness level. It will not override a description you provided yourself, but with a 3-finger tap on the image you will hear the Appledescription.
Localization
Localization is important if you want to support regional languages on your app. All you need to support this is to pass NSLocalizedString to the accessibility labels.
If you want to make sure that a particular accessibility label is read out in a certain language, irrespective of the system language, set the attributedAccessibilityLabel, with a language attribute.
let attributedLabel = NSAttributedString(string: "Bonjour", attributes: [NSAttributedString.Key.accessibilitySpeechLanguage : "fr-FR"])
label.accessibilityAttributedLabel = attributedLabel
Check if Voiceover is running
Sometimes it might be useful to determine whether voiceover is running or not. UIAccessibility provides a static variable isVoiceOverRunning to determine if voiceover is running.
if UIAccessibility.isVoiceOverRunning {
     /// voiceover is running
}
You can also sign up as an observer for anytime voiceover status is changed.
NotificationCenter.default.addObserver(self, selector: #selector(voiceOverStatusChanged), name: UIAccessibility.voiceOverStatusDidChangeNotification, object: nil)Currencies
iOS provides NumberFormatter and Locale as out of the box solutions for implementing accessibility to currencies. Let’s say you want to display the Rp.1,000,000 (Indonesian Rupiah) for a label. If there’s no accessibilityLabel set for the label, voiceover will read this as ‘RP dot one million’.
Use the following piece of code to localize the currency number:
label.accessibilityLabel = NumberFormatter.localizedString(from: NSNumber(value: 1000000), number: .spellOut)Now, the voiceover will read out satu juta (meaning one million in Indonesian)instead. We have now localized the number, but this does not add the currency name by itself. To do that, use Locale.
let locale = Locale(identifier: "id_ID")
let currencyName = locale.localizedString(forCurrencyCode: locale.currencyCode!)!
label.accessibilityLabel = NumberFormatter.localizedString(from: NSNumber(value: 1000000), number: .spellOut) + currencyName
Now voiceover will read out “satu juta Indonesian Rupiah”.
Key points while adding accessibility
- Consistency is key. Make sure that all the accessibility labels that you set are consistent across the app and try to make it consistent with the iOS voiceover labels as well. In case of keyboards, we made sure that the accessibility labels for the divide, multiply, add, and subtract were same as the once used in the calculator app.
- Try and reduce the touch points by grouping data together. This is really important as visually impaired users access the app using swipes. If you have fragmented information across multiple labels and buttons, it becomes difficult for users to traverse through the app. Take the youtube app for eg. When voiceover is turned on, each video cell is accessible, while the title label, go to channel button, the video length label are not accessible.
- Club information together to give a much clearer idea of whats on the screen. Take any food delivery app for example. When a user touches any cell, it’s better to add the accessibility label in such a way that they get the name, price, description, and rating of the food from the cell itself, rather than accessing these information individually.
- Try and add as much hints as you can.
- Start focusing on accessibility from the design stage. When a design is created by keeping accessibility in mind, you will not face major issues while implementing accessibility.
- Lastly, As much as automation testing helps, please make sure to test out your app by turning voiceover on. This helps a lot in figuring out how you can improve the voiceover experience.
These are some of the basics of adding accessibility to an iOS app.
If you have more questions or want to discuss more about how to make apps accessible, feel free to reach out to me.

To read more about how we build products with empathy, check out our blogs. To build products with empathy, join us. 🖖