What You Might Not Know About LayoutInflater on Android
Two important things to keep in mind before using LayoutInflater’s ‘Inflate’ method.

By Abhishek Jangra
I started my journey as an Android developer about six months ago, so I am quite new to the community. However, there is something that I need to talk about, which many people tend to miss and lacks clear documentation.
As the title says, this post deals with LayoutInflater in Android and its most common usage with the inflate method.
This method is used to create a view object from an XML file (where the UI designs are created). Then, you can have this view show up wherever you want (of course, in your app, not your freezer 😋). I think this is a good time to look at the basic syntax.
Here, newView is the View Object created from the layout file new_view which is the first argument to the inflate method. The second argument, rootView is used to calculate the layout parameters for the newView and the third argument is a Boolean attachToRoot which if true, will automatically add the view generated from the new_view XML to the rootView.
Sounds straightforward right?
Let’s look into some things that we tend to miss here.
1. What does it return?
It is very easy to make the assumption that the inflate method will return the view generated from the new_view XML.
Well, that’s smart … but wrong. There is a catch here.
If attachToRoot is false, it will return the view generated from the new_view XML which you can manually add to view later.
But, if attachToRoot is true, it will automatically add the view generated from the new_view XML to the rootView but will not return it. It will return the rootView itself. Now this will matter when you try to do something like removing this view later. Let me show you.
We’re going to use an activity, let’s call it the MainActivity. It essentially has an Empty vertically oriented Linear Layout with the id activity_main.
Let’s add a new view (a simple red color rectangle) to this activity,
The result is shown in the image ‘a’ below. Looks good!
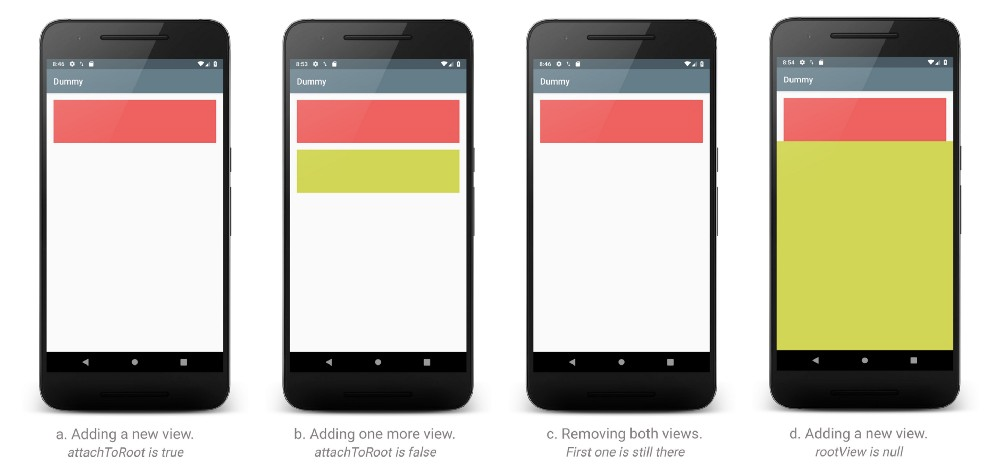
Now let’s add one more. But also change its color and name to something like … lime 🍋. In this case, let’s keep attachToRoot as false, we’ll get the view which we can then add to root manually after changing the text. The result is shown in the image ‘b’.
Now, let’s remove these views,
Now check out the result in image ‘c’. You’ll notice that only lime was removed. As stated above, red is not an actual reference to the new view generated, it was a reference to the root, and of course, a root can’t remove itself … from itself, so it didn’t work. But we had no problems removing lime.
2. Why is rootView needed if attachToRoot is false?
The thing is, rootView here is also used to calculate layout parameters for the new view that will be generated. If you don’t provide the rootView, the layout attributes of the new view will be ignored and it will look messed up. You can see this in the image ‘d’.
These were the 2 very important questions that need to be answered before using LayoutInflater’s inflate method.
Thanks for reading, and leave feedback in the comments below.
Ciao!
It’s easy to over look simple things isn’t it? We know this, which is why we happen to advocate pair programming and TDD. If you share these beliefs, and like a flexible work environment with plenty of tough problems to solve, we may have just the job for you. Check out gojek.jobs and grab the chance to help us redefine on-demand services in Southeast Asia. 🖖