Test Mobile Apps Using Web Traffic Interception and Mocking
How to write reusable scripts using Python and mitmproxy to test Android/iOS applications.
By Suman Das
As a software engineer, it is very common to encounter use cases where one needs to intercept and modify web traffic and test out certain scenarios. Common scenarios for such use cases would be to test out a feature where the backend code hasn’t been written yet or is unavailable, changing the request or response to see how the app or the web services are responding etc. In such cases, testing the feature by mocking the backend or intercepting and changing web traffic is the best way to go forward.
mitmproxy is one very handy tool for this purpose. It is a free and open source interactive HTTP proxy. The tool has three modes:
- mitmproxy is the Command Line mode where we get network traffic on our shell/terminal/command prompt.
- mitmweb provides an interactive Web UI to monitor network traffic
- mitmdump is similar to tcpdump and gives one the ability to programatically change the network.
My reason for going ahead with mitmproxy to solve such scenarios was the fact that it provides a Scripting API.
As per the official documentation:
The scripting API offers full control over mitmproxy and makes it possible to automatically modify messages, redirect traffic, visualize messages, or implement custom commands.
Using Python along with this powerful API, it is very convenient to write utility scripts and run them using mitmdump mode to intercept web traffic, mock backend behaviour and reuse the scripts every time as per requirement. Before we can see how we can achieve this, here is a very helpful article on how to set up mitmproxy and basic usage by Gaurav Sharma.
Understanding the Python script
Before writing the script, it is always a good practice to understand the components of the script. Let’s take the simple example of the following:
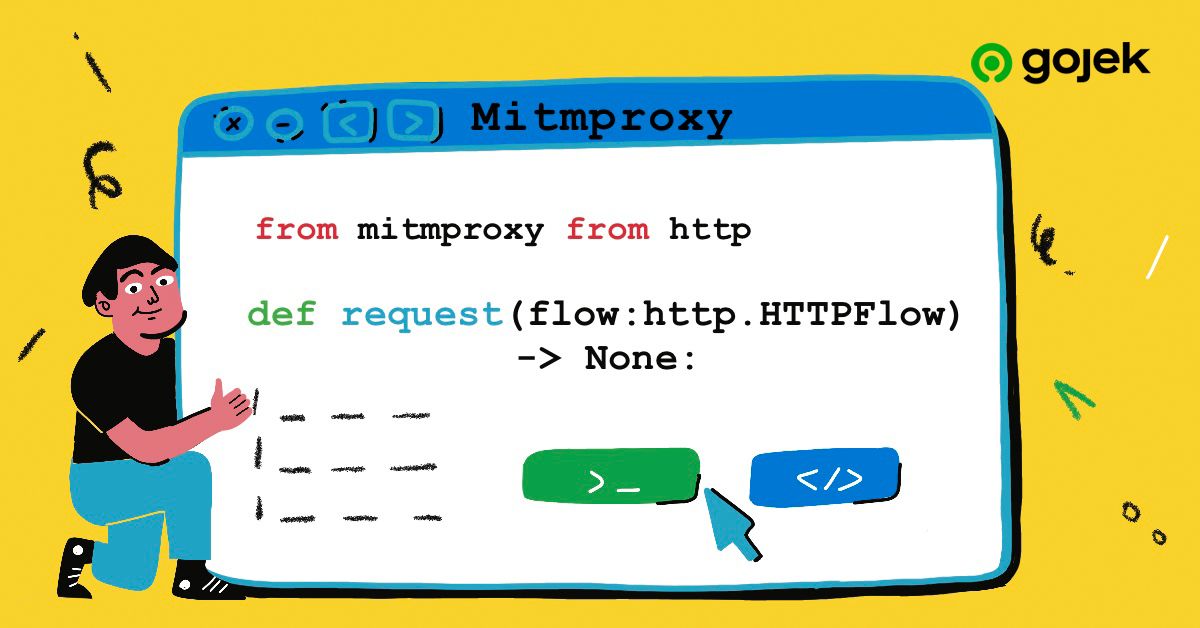
from mitmproxy import http
def request(flow: http.HTTPFlow) -> None:

if flow.request.pretty_url == "http://example.com/path":
        flow.response = http.HTTPResponse.make(
            200,
            b"Hello World",
            {"Content-Type": "text/html"}
        )
This is one of the example scripts on the official mitmproxy GitHub Repository. The basic purpose of this script is to listen for a particular endpoint and send a modified response with a different status code, header and body via the proxy. Simple enough? Well that is how simple it actually is. Lets go a little deeper to see how this happens.
The script works on the basis of an event-based mechanism. Notice the method signature:
def request(flow: http.HTTPFlow) -> None:
This is a nothing but an event. As the name suggests, this event waits for an incoming request. If we look at the argument of this method it is an object named flow which is of the http.HTTPFlow class. Basically, this object contains the entire network details of a particular HTTP record and the script manipulates this particular object to alter network details on the fly. That is what the block of code inside the method does.
if flow.request.pretty_url == "http://example.com/path":
As mentioned before, this flow object contains all details of the HTTP record. Here we compare the URL of this record with a required value:
flow.response = http.HTTPResponse.make(200,b"Hello World",{"Content-Type": "text/html"})This piece of code alters the response to be sent in the flow object.
So once this script is played out, it will look for the HTTP record with URL http://example.com/path, halt the flow there, change the response, and send it to the client.
Writing your own mocking script in Python
Assuming you have installed mitmproxy on your machine and understood the mechanism of the script, it is time we write our own reusable code to see how we can leverage this powerful API.
We now need an app to intercept the network. I will be using the Recipe Book Android app for this.
For iOS applications, it will follow the same process. Only the installation of mitmproxy on iOS phones is different (covered in the installation link mentioned earlier).
Pre-requisites
Make sure you have the following set up:
1. Python3 installed in your system (check viapython3 --version).
2. mitmproxy installed on laptop and phone
3. IDE (PyCharm)
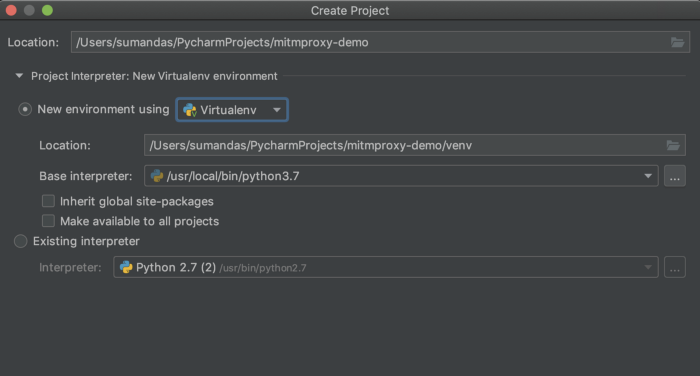
Step 1 : Create a new project and Virtual Environment
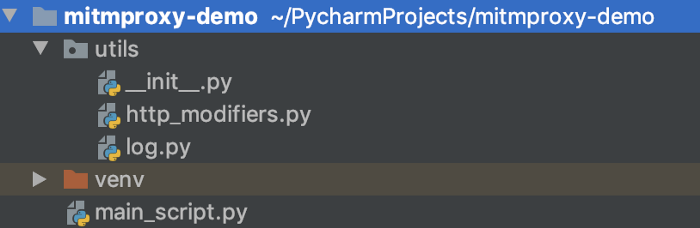
I’ll be using PyCharm IDE for this (always a good practice to have a structured code base). It is advisable to keep the main_script.py at your project root and the utils package should be at the same level as main_script.py. Otherwise there may be some issues in modules not being recognised when using mitmproxy package.The directory structure would look like this:
|-mitmproxy-demo
|--utils
|---__init.py__
|---http_modifiers.py
|---log.py
|--main_script.py
We will be creating a virtual environment to manage our dependencies. PyCharm’s New Project option will let you choose the virtual environment creation technique. For this project, I shall be using a new virtual environment via Virtualenv. One can also use Pipenv for this purpose.
Once this is done, the project directory is ready. There will be a folder in it called venv, which will be the core of our virtual environment. Dependencies for this project will be present in this folder. To activate it, run the following command:
source venv/bin/activateThis will activate the virtual environment named venv. Right now the major dependency we need is the mitmproxy package. So let’s install it:
pip3 install mitmproxyThis will install the required package and we will be good to go with our scripting.
Step 2 : Scripting the reusable components
If you remember, the idea was to write scripts which can be enhanced and reused and not started from scratch every time we test such scenarios. So let’s script the helper scripts which we will need.
http_modifiers.py will be used to provide helper methods to alter request and response related components. It will use the http module from mitmproxy.
mitmdump mode however doesn’t have a very detailed logger like mitmproxy or mitmweb. So I also created a basic logger script log.py to show HTTP record details on the console:
Step 3: Setting up the event handlers in the main script
As mentioned before, mitmproxy works on the basis of event handling. We will make use of two events now (requestand response) in our main_script.pyfile. In this script, we will also be importing thejson package and the utils package mentioned above. The code looks like this:
Step 4: Running the script
mitmdump is used to run the script. The main_script.py can be run with the following command:
mitmdump -s main_script.pyThis command will start the proxy and we will get a log of network requests.

Step 5: Scripting the use cases on the fly
One of the biggest advantages of mitmproxy is its support for dynamic scripting. In other words if you have your base script ready, all you need to do is update the code in the events and when you save it the events will be restarted again. Now let us solve a couple of common use cases engineers encounter in their day to day lives and lets see how our scripts come into play in them
Suppose we have a test scenario where we need to see how our app would behave when we receive a 5xx status code from server. In such cases testing for 5xx would require communication to the backend team for help as 5xx are server issues. We would generally want to do it independently. For example if the test case requires checking the current recipe app’s search results for ‘Egg Recipes’ or any other recipe when the server throws a 503 then we can achieve this with our scripts in the following manner.
NOTE :-Sometimes the responses may be cached so one might need to clear the cache and restart the app so that the changes get reflected. Now we will see how the app reacts to a 503 error.
That was pretty straightforward. Now lets see how we can handle the other use cases.
Suppose we have a scenario where the server would do some operation on the headers of the incoming request. A QA Engineer might have a test case where they might need to modify headers to see if the system breaks. In such cases, we script our events in the following manner:

What we did in the above case was identify a couple of header fields — namely access-key , Host and app-name (which would be given in our test scenario description) and changed their values to dummy data via our proxy before sending the request. On doing so, we can see the system broke and returned a 404 . So we broke the system by manipulating our headers.


One of the common use cases which I generally face is the requirement of a mocked response body for an endpoint. There were couple of testing requirements in my organisation where I was aware that I wont be getting the required response from backend and had to mock in order to get the changes on the app. This is a very common case which every engineer faces while testing and we can solve this use case in the following ways.
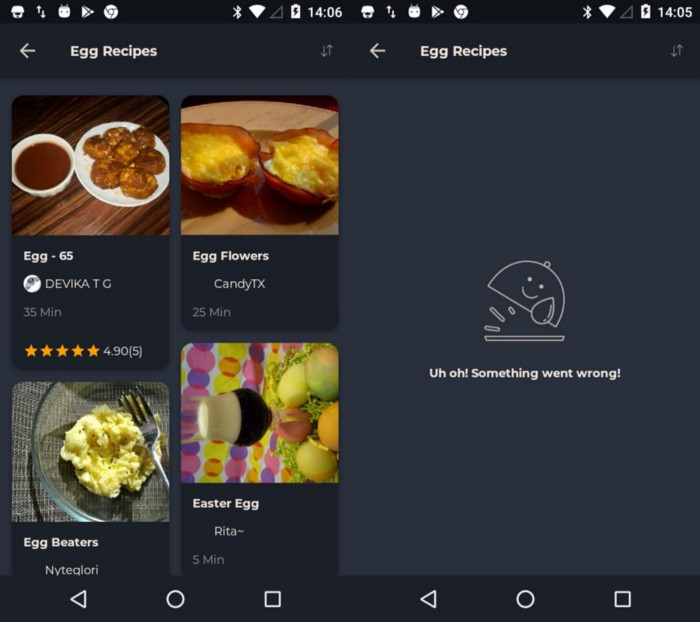
Let’s say in our current app, we wanted to test layout of the app’s search functionality with a limited set of results. Unfortunately the search results would always be greater than 4. To test this quickly without involving any type of dependency, we can use our scripts in the following manner.
This will result in the following:

So how did we solve this use case? Knowing that we won’t be getting a result list of less than 4 recipes, we intercepted the response and reduced the recipe list to 3 recipes. Hence we can now test the layout when it has less than 4 orders. Without the proxy logic, we would have required dependency teams to provide us with the right data or change code and we avoided both using this technique.
In the above example however, we are going through an additional step. That is, we are changing the response after receiving it from the server. Let us take a modified use case which is slightly different.
Suppose a test scenario demands that the search layout be tested for empty list i.e no recipes (and we don’t have the backend up). This is a priority test case that needs to be tested. Unlike our previous example, we can’t get the response and then modify it. How do we solve this then ? Well this is where our above discussion comes into play. Lets create the script for this:

So this time we crafted the complete API response ourselves and sent it to the client. This prevented going to the backend and also solved our test case. Using this technique, we could have solved our previous problem of less than 4 recipes had the backend been down.
But while this technique avoids the API call being actually made, the proxy to send back the response needs the entire JSON response, as opposed to editing an already received response in the previous example. So we need to be aware of the complete response body in this case because it is us who make the new response and forward it to the client instead of modifying an already received response. So it is advisable to use this technique if backend is down.
That’s how you can create mock scripts and programatically change network traffic. Although I have mentioned a handful of use cases which are commonly faced in day to day testing activities, there are plenty more. You can clone the official GitHub Repository of mitmproxy and go through the examples section, which has a combination of simple and complex use cases. Until next time, happy scripting !!
