Pixel Perfect UI at Scale
How we maintain UI tests for our design language system on iOS.
By Vikas and Abhinav from UX-Engineering.
Developers and designers are entities who always try to do their best to build a beautiful product for users. But this is not always enough to ensure that the carefully-crafted designs look exactly the same on a user’s device.
To make sure developers build UI close to the designs, we have to understand the designs first, discuss with designers, and double check on Zeplin after development. We also have to make sure the UI doesn’t break in different scenarios, code changes etc.
This all takes a tremendous amount of time and is not always feasible.
Wouldn’t it be great if we could automatically check if everything is as the designer intended?
In this post, we’re going to discuss one way of solving this gap between designed UI and developed UI efficiently. (In other words, the gap between developers and designers.)
Asphalt — Maintain Consistency
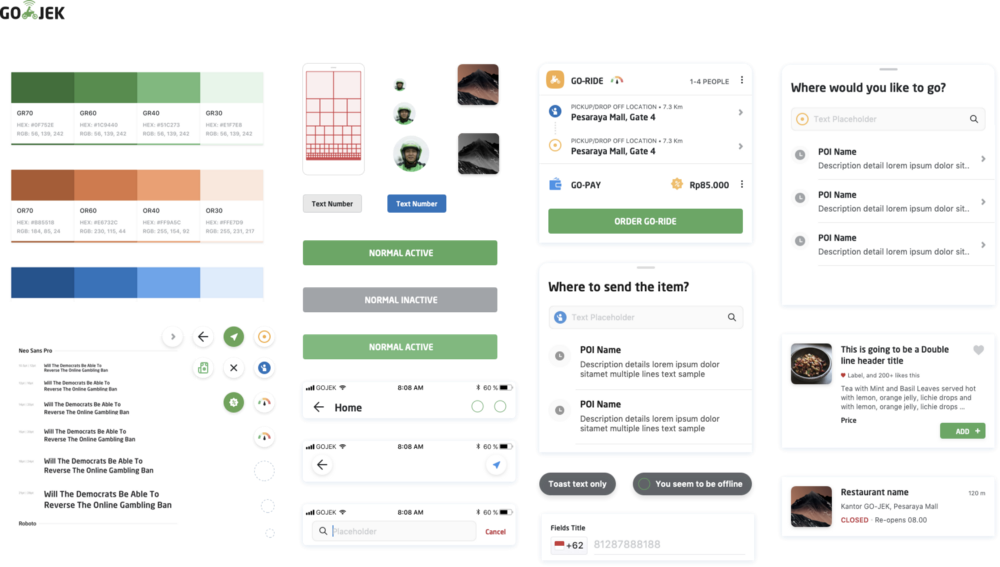
We’ve been talking about our design language system, Asphalt, for some time now. It was built to ensure that our UI is consistent and easy to use across GOJEK’s vast array of products and services.
Recap: Asphalt is GO-JEK’s very own design language system. It aims to unite developers, designers, and all other functions across the org for consistency and efficiency. It is the foundation to be built upon.
The problem?
In Asphalt, we treat components like reusable Lego blocks. This helps in building components at a fast pace.
Build UI like Lego
In the process, developers tend to update or extend the functionality of a component, and they need to be able to do this without causing side effects to other components.
We felt the need for a monitoring system to check UI components with each commit/change a developer makes, that informs the developer of the impact of the change. We also needed to run this system on autopilot mode, check our components frequently and detect any anomalies. The objective was not to replace human operators, but to assist them. This is what we seek to achieve with our UI Components Library.
To achieve this goal, we settled on snapshot tests.
Snapshot Testing
Conceptually, snapshot testing is a simple idea: take a screenshot of your user interface and store it as a reference image. Then, make your tests take screenshots of the same UI and compare it to the reference image. Once the test is complete, let the developer running the test see the difference and the affected changes, and decide if the changes are correct.
Implementing Snapshot tests on iOS
We use XCUITest framework that ships with Xcode, which allows you to easily develop UI tests that reflect users’ interaction with the application.
Finding the diff between two screenshots
We use Core Image filters (CISubtractBlendMode and CIAreaAverage) to find the diff between a reference screenshot and a screenshot of the current state of a component.
In the code sample above, we use a UIImage extension where DifferenceFilter subtracts the background image sample colour from the source image sample colour and gives us the difference image. Both the input and output image we get is a CIImage.
We inject the difference image to AverageFilter, which returns a single-pixel image that contains the average colour for the region of interest.
We run the averageFilterOuputImage through the firstPixelColor function shown above. This returns UIColor which we use to conclude whether it is all black or not. If it is not completely black, then we’ve got a difference in our source image.
In our UI tests, we launch the screen with the component we need to test in our demo app and call this image diff algorithm. If there is a difference, we fail the test and generate a report showing the diff.
Observing the results
Here’s an example that we recently experienced.

We have this button class, TextButton, which is given a PrimaryState and is responsible for updating its background colours, text colours, enabled state, and text. We include this button on most of our views in the app for primary interactions. We wanted to change some of the rendering logic in the button, but we inadvertently broke another part of our app that we didn’t realise was using TextButton too.
As we can see from the screenshot, the test highlighted that the border colour was different between the two images which was not what we intended. Snapshot tests saved us from committing a mistake that would have led to bugs across the app in different products and caused delays in our shipping cycle.
Managing reference screenshots
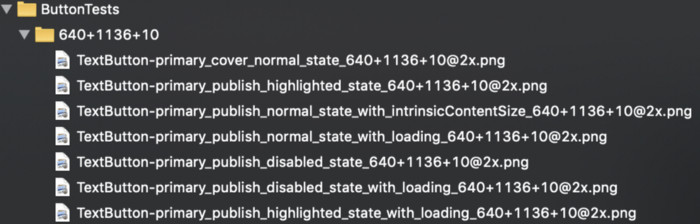
We keep our screenshots segregated by device type. We have a naming convention which goes device_resolution+os_version. Above, you’ll see the 640+1136+10 folder and reference images for TextButtons. These images are generated by running the tests on iPhone 5s( which has a device resolution of 640x1136 and runs iOS 10). Similarly, we generate images for multiple available devices.
Sample code for ButtonTests above has a folderName variable and testPrimaryButton() function. When we run the test above for the first time after building the component, we generate these images from identifier TextButton-primary_cover_normal_state appending the screen dimensions and save them under the folder named ButtonTests. This way, we’re generating reference images from our UITest code only. After adding these folders in the bundle we run the tests again and this time screenshotHelper has a reference image in the bundle to test them against the UI screenshot. This way we ensure a consistent pattern (like the naming convention, bundle structure etc) for all reference images and make the process faster.
So does it work?
The advantages are that you can easily test complex structures without writing much code, you get good warnings when something changed, and you can easily update this test.
The disadvantages are that from just reading the test, it is not always clear what is tested and what the expected behaviour is. Sometimes, the created snapshot is so complex that you overlook wrong assumptions that then end up as expected results. As it is so easy to update snapshots, wrong stuff can sneak in.
One challenge is, at around test count 170, Xcode or xcodebuildwelcomed us with the following error:
Waiting for accessibility to load
Wait for app to idle
    App event loop idle notification not received, will attempt to continue.
    App animations complete notification not received, will attempt to continue.
After this error, all the subsequent tests fail with another message:
Waiting for accessibility to load Assertion Failure: testUITests.swift:21: UI Testing Failure — App accessibility isn’t loadedWe’ve looked around Google and found here the details about this issue. We’ve tried multiple workarounds mentioned in the blog, also tried to make multiple targets and schemes for a number of tests, but in vain.
Until Apple finally fixes this issue, we’re keeping the count of tests lower than 170 😑 (If you know why this happens, feel free to leave a comment below).
One more challenge is to run the tests faster. Currently, we’ve disabled all the animations by setting the following in the Appdelegate didFinishLaunchingWithOptions function. Disabling all animations makes the tests more reliable and makes them run quicker.
if ProcessInfo.processInfo.arguments.contains("AsphaltUITests") {
UIView.setAnimationsEnabled(false)
}
Flaky Tests also need a special mention. As our test suite is expanding we’re starting to face the problem of one or two tests failing randomly. To solve this kind of misbehaviour, we’re currently experimenting with fastlane-plugin-test_center multi-scan functionality to rerun only those fragile tests, saving us time taken to rerun the complete suite.
Note: this feature does not support Xcode parallel tests functionality yet but it is WIP here.
What’s next in Snapshot Testing?
We’re planning to auto-generate UITest classes by analyzing the UIComponents classes. Most of the times the code for UITest class is dumb. Reach up to the component, take a screenshot of the view assigned accessibility identifier and match it with the reference image(whose filename is generated by class name). Our first step is to autogenerate these dumb steps and then move up to write stencils for different behaviours of components like swipe, buttons, max data, min data and many more. Of course, we’ll not be able to cover all testing scenarios with this process, but this will remove a lot of generic testing scenarios we write for a UIComponent.
In Summary
Overall, Snapshot tests have served us well, but a tool is only as good as its user. So it’s important to make them granular, readable and treat them just like you would treat normal tests. Combining these with a culture of thorough code reviews has paid great dividends for us.
I hope this gives you a clear picture of what snapshot tests are and how they can be used as a part of a comprehensive testing strategy.
As designers and developers, there are always things to be improved and processes to be streamlined. At GOJEK, this is something we realise and attempt to overcome with a culture of close collaboration between teams. If this culture is something you can contribute to, check out gojek.jobs — we’re looking for smart minds to help us build Southeast Asia’s SuperApp 🖖