Introducing Vesemir: Gojek's Virtual Machine Deployment Service
The how and why of Vesemir, our in-house Python service that helps us with virtual machine deployment.

By Tasdik Rahman
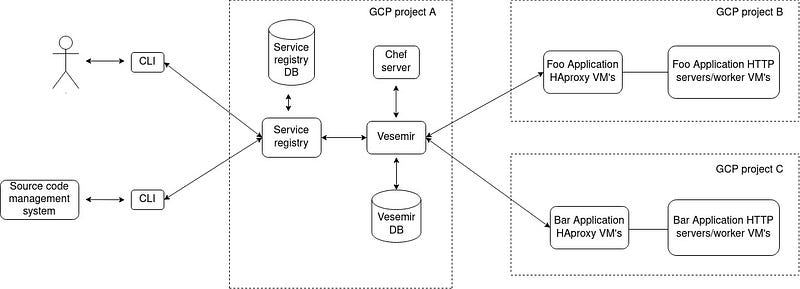
The build and deployment pipeline varies from one organisation to another, given each company will have its own requirements. Different folks, different strokes. Here’s a peek into Gojek’s deployment platform:
It comprises of a central service registry, two separate services to deploy to virtual machines and kubernetes respectively, a CLI to interact with the service registry. This is given out to our developers, using which they can do numerous things for their application in a self-serve manner — one of these things being the ability to deploy their applications via the CLI.
The idea is to abstract out the deployment process from developers as much as possible, and also giving them the means to debug with the logs being shown to them, which are meaningful to them to figure out what went wrong if it doesn’t work as expected.
In this blog, I will specifically talk about our virtual machine deployment service, Vesemir, and how we went about revamping its infrastructure along with refactoring it to keep it healthy and maintainable for others to work on its codebase.
Given GCP doesn’t have a service similar to AWS codedeploy, and necessity breeds innovation, Vesemir was built.
What does it really do?
Vesemir is an in-house Python service, which is a wrapper on top of chef APIs, which it receives a request for deploying a service in a particular cluster (a GCP project), filters out the VM’s where it has to deploy the changeset and then goes about deploying the changeset — either one at a time or at the level of concurrency insisted upon by the request.
Vesemir helps us deploy to integration and production environments, 300+ times every day.
How does it do it?
The initial request payload, bits which are of most relevance are:
- Application name
- Environment
- Team
- Chef tags to be used for filtering the application VM’s
- HAProxy metadata (degradation time specified, cookbook/recipe/tags to filter the HAProxy boxes, HAProxy backend)
- Concurrency (number of VM’s to deploy at a time)
Once Vesemir, receives this piece of information, and queries the chef server via pychef. When the information passed for the search tags, the query for it gets constructed and is sent to the central chef server. The hostnames and their IPs then get parsed.
This takes care of the first bit of the problem, where VM’s are to be used for deploying the changeset.
Along with this bit, the playbook.PlaybookExecutor gets initialised with the ansible-playbook (more on this later), which we would be executing on the hosts found, the inventory file, and the variable manager named argument taking in extra variables which are going to be used by the templatised playbook.
We write the ansible inventory file in a temporary file, using NamedTemporaryFile which gets deleted after the whole request/response lifecycle for a deployment. This then gets fed into the InventoryManager, where we pass the hostnamefile which we created above as sources.
The ansible playbook which gets fed into playbook.PlaybookExecutor, is a static playbook with jinja templating, where we feed the options via the VariableManager.
The options named var, will take in details like, which user and other authz/authn details to be used by ansible to ssh into the hosts, along with options like forks where the concurrency is set for the number of boxes where we would want to run the playbook.
The next step is to execute the run method on the initialized object of playbook.PlaybookExecutor. The important bit here after the run is the collection of stats that we pick up, from the TaskQueueManager, which is what we then use to check for nodes where the playbook ran successfully or not if the hosts were unreachable and so on.
This piece of information is then used to form a response to be given back to the client which has called Vesemir.
What does the playbook do?
First, it disables the server where it is first going to deploy, in the haproxy backend for the application servers. It introduces the changeset, restarts the service, enables this VM back in the HAproxy backend with weights if provided during the request. An option to sleep for a bit is also introduced, which is again controlled by the request, before which the VM is inserted back with 100% weight.
The playbook is then looped over the hosts, returned by the chef query while searching, all while executing the playbook tasks on the hosts.
Pros of this deployment pattern
Since we control the deployment platform tooling, it allows for us to have a level of flexibility, which may not be possible with vendors. Everything is more or less an outcome of this flexibility which we get.
Cons of this deployment pattern
Given the changelog is introduced in each VM in such a way, immutability is not possible. This is again to the AMIbased approach, where AWS codedeploy would do something similar to inject the codebase into the target VMs.
There are more moving parts in the system, which depend on external dependencies. For example: ansible being a very important part for Vesemir to deploy the changeset, right from using piggybacking on the ssh interface provided, to the templatising of the steps of execution to be done.
Takeaways
There are numerous ways in which people end up deploying their codebases. Maintaining Vesemir for sometime now, and having seen both sides of having immutable deployments via container images for deploying changeset via Vesemir, it’s not very hard to see the selling point of immutability.
More on how we ended up revamping Vesemir, in Part-2 of this blog.

Find more stories from our vault, here.
Also, we’re hiring! Check out open job positions by clicking below: