Containers, Shells, and Mounts, from Scratch
The second in a series of posts on running Containers we built without Docker, LXC, or rkt

By Giri Kuncoro
To start off with context, learn Part 1 of the series on how we build a Container filesystem from scratch with dnf, changing root directory with chroot, and isolating process tree inside the Container with namespaces.
This writeup will reuse rootfs directory and do some magic inside it. So, before moving forward, let’s get a Linux machine and the rootfs ready, or if you are lazy, you can grab the tarball here.
Entering Namespaces
Remember that we can get inside a running Docker container with docker exec ?
$ docker run -t -d --name foo ubuntu:16.04
$ docker exec -it foo /bin/bash
root@19a1e96bb6c7:/#
We are going to discover how to do the same. First, let’s run chroot shell process with unshared PID namespace.
$ sudo unshare --pid --fork --mount-proc=$PWD/rootfs/proc chroot rootfs /bin/bashNow that we have our Container running, and from the host, how do we get inside a Container? People often tell: “Just run a SSH server inside your container!”. This is a misconception since we don’t need to to run SSH daemon to allow accessing a Container. Well, unless your container is an SSH server, which is unlikely.
So, how do we really enter a running Container, then? The short answer is, we run a shell into existing namespace with a tool called nsenter.
nsenter allows us to run a program with namespaces of other processes, or enter into namespaces. This small tool will help us running another shell process inside an existing PID namespace we already have.
Now, next question is, how do we find namespaces that our existing chroot shell is running on? The answer can be found under /proc/$PID/ns, in which Kernel exposes namespaces info of a process.
Let’s find what PID is our chroot shell running as. Open a new terminal and execute psfrom it.
(From host, outside chroot)
$ ps ax | grep /bin/bash
...
4436 pts/0    S+     0:00 /bin/bash
We can now find the namespaces info of PID 4436 under /proc . From here, we could grab the PID namespace for our chroot shell located under /proc/4436/ns/pid
$ sudo ls -l /proc/4436/ns
total 0
lrwxrwxrwx. 1 root root 0 Jul 14 23:13 cgroup -> cgroup:[4026531835]
lrwxrwxrwx. 1 root root 0 Jul 14 23:13 ipc -> ipc:[4026531839]
lrwxrwxrwx. 1 root root 0 Jul 14 23:13 mnt -> mnt:[4026532151]
lrwxrwxrwx. 1 root root 0 Jul 14 23:13 net -> net:[4026531993]
lrwxrwxrwx. 1 root root 0 Jul 14 23:13 pid -> pid:[4026532152]
lrwxrwxrwx. 1 root root 0 Jul 14 23:13 pid_for_children -> pid:[4026532152]
lrwxrwxrwx. 1 root root 0 Jul 14 23:13 user -> user:[4026531837]
lrwxrwxrwx. 1 root root 0 Jul 14 23:13 uts -> uts:[4026531838]
Now, let’s run a new shell process inside the first chroot shell PID namespace with nsenter. We simply do this by passing /proc/4436/ns/pid argument to tell nsenter that we want to run process in this PID namespace.
$ sudo nsenter --pid=/proc/4436/ns/pid \
  unshare --fork --mount-proc=$PWD/rootfs/proc \
  chroot $PWD/rootfs /bin/bash
# ps ax
  PID TTY      STAT   TIME COMMAND
    1 ?        S+     0:00 /bin/bash
    6 ?        S      0:00 /bin/bash
    7 ?        R+     0:00 ps ax
Since we are running the new shell inside existing PID namespace, our container now has 2 shell processes (PID 1 for first shell, PID 6 for second shell). We have now successfully “entered existing container”. Try to run a top process here.
(From second chroot shell)
# top
This top process could obviously be seen from the first shell as well.
(From first chroot shell)
# ps aux | grep top
root         6  0.0  0.4  21960  2388 ?        S+   13:56   0:00 top
Since both shell processes are in the same PID namespace, first shell can kill top process running in second shell.
(From first chroot shell)
# kill 6
Volume Mounts
Ever thought how Docker injects files into running a Container? We usually do this by mapping host path and Container path via -v flag with docker command.
$ docker run -t -d --name=foo -v $PWD/gojek:/tmp ubuntu:16.04
$ docker exec foo ls /tmp
hi
We could demonstrate the same thing into our Container through a Linux feature called bind mount.
bind mount is essentially an alternate view of a directory tree. Traditionally, mounting provides a view of a storage device under directory tree. What bind mount does instead, it takes the existing directory tree and replicates it under a different view point. The files under bind mount are the same as the original, so modified files should be reflected immediately as both points share the same view.
Now, let’s try this out. Prepare a dummy directory and file that we want to inject into our chroot directory. We will expose this file as read-only into chroot shell using bind mount.
$ mkdir gojek && echo "Hello from GO-JEK" > gojek/hi
Next is to create target directory inside our rootfs and bind mount our dummy directory.
(From chroot)
# mkdir /var/gojek
(From host, outside chroot)
$ sudo mount --bind -o ro $PWD/gojek $PWD/rootfs/var/gojek
Our Container can now see the dummy directory and file inside.
(From chroot)
# ls /var/gojek
hi
# cat /var/gojek/hi
Hello from GO-JEK
Since we did bind mount with -o ro (read-only), the shell process inside chroot cannot modify the file.
(From chroot)
# echo "GO-PAY is awesome" > /var/gojek/hi
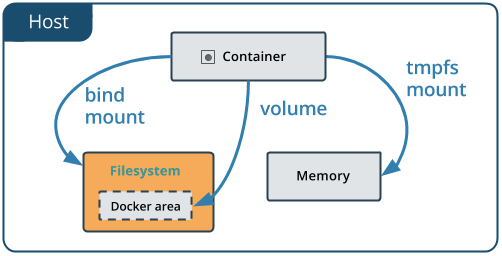
bash: /var/gojek/hi: Read-only file systemWe have successfully tried mounting out file or directory on host into our Container. Well, if you are a Docker expert, you would know that in docker command, what we did is actually doing --mount instead of -v flag, which is a bit different. Bind mounts rely on specific directory structure in host machine (gojek directory being available on host in our case). In other hand, Volume is completely managed by Docker, where new directory is created within Docker storage directory and Docker manages its contents. However, this is Docker specific and for the purpose of our container experimentation, bind mount is sufficient.
What’s Next?
From this post and the previous one, we have learned how to use various Linux Kernel features to build, run, and access our Container. We will continue the next series of posts with cgroup, network namespace deepdive, and Container security topics to further enhance our DIY container capabilities, so stay tuned!
Oh, and we are hiring! Our team is dealing with Golang, containers, Kubernetes, cloud native toolings, and CNCF open source contribution. If Container focused infrastructure excites you and you would like to be part of a GO-JEK Cloud Native future, please reach out to us on gojek.jobs .
References
- Why you don’t need to run SSHd in your Docker Container, Jerome Petazzoni
- Tmpfs and Bind Mounts, Daniel Robbin
- Containers from Scratch, Eric Chiang