Brew the Perfect Cuppa
How to set up and use Espresso — Google’s instrumentation testing framework for Android.

By Ratnesh Navlakhe
Human beings are prone to error. We make mistakes. In engineering scenarios, mistakes have the unfortunate tendency of making software vulnerable and increasing production support. That’s what makes testing important. It is the only solution we have at our disposal to overcome our own frailties.
All code is guilty, unless proven wrong — AnonymousThis post is about UI testing of Android applications using Espresso — Google’s instrumentation testing framework.
What is Espresso?
There are mainly two types of testing: Unit Testing and Instrumentation Testing. The Espresso framework is designed for the latter. It allows writing concise, beautiful, and reliable Android UI tests.

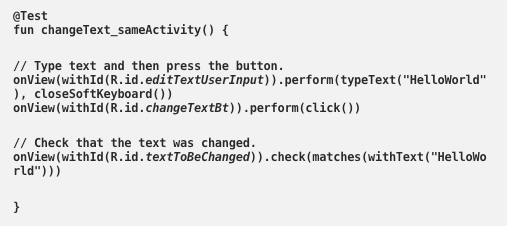
This is an example of an Espresso test.
How do I set it up?
You can find the official instructions here.
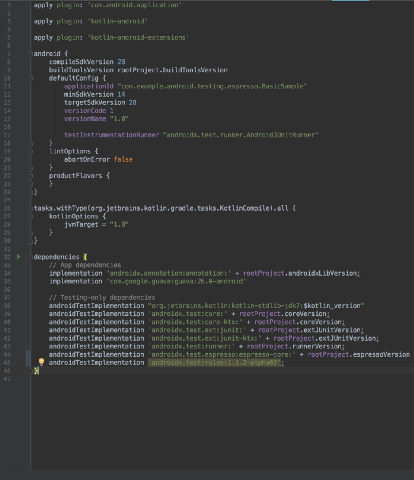
Go to your app/build.gradle
- Add these lines at the end of dependencies block.
// Don't worry if your versions are different, it's ok :)
dependencies {
androidTestImplementation 'androidx.test:runner:1.1.2-alpha02'
androidTestImplementation 'androidx.test.espresso:espresso-core:3.2.0-alpha02'
}
2. Add Android-related Configs in app/build.gradleandroid {testInstrumentationRunner 'androidx.test.runner.AndroidJUnitRunner'}
This sets up the Android Instrumentation Runner for your app.
AndroidJUnitRunner is an instrumentation runner that runs JUnit3 and JUnit4 tests against an Android package (application).
In order to test the UI, create a test in the location
:module-name/src/androidTest/java/And annotate it with @RunWith(AndroidJUnit4::class)
The instrumentation runner will process each test class and inspect its annotations. It will determine which class runner is set with @RunWith, initialise it, and use it to run the tests in that class. In Android’s case, the AndroidJUnitRunner explicitly checks if the AndroidJUnit4 class runner is set to allow passing configuration parameters to it.
AndroidTestRule is used to reduce the boilerplate code you need to write. By using AndroidTestRule, the activity being tested is launched by Espresso before each test method annotated with @Test (and before any method annotated with @Before.
The framework handles shutting down the activity after the test finishes and all methods annotated with @After are run.
Example Code
Espresso uses onView Matcher to find a particular view in the View hierarchy. onView takes a Matcher as an argument.
As you can see in this cheatsheet, Espresso provides multiple ViewMatchers.
In the code shown earlier:
- In
changeText_sameActivitythe onView method is used with view matcher propertywithId. This is done to get the resource ID (R.id) of EditText to perform a UserInteraction on UI component. It also closes soft keyboard (if open). - In the next line, we are performing a click event on the
Text Changebutton. - The last line uses ViewAssertions where we validate/check that the UI reflects the expected state or behaviour after these user interactions are performed.
You can find the source code of the project below.
 android
This post is an introduction to Espresso, keep an eye on this space for future updates.
If you enjoyed this story, do share it with others, and feel free to leave a comment below.
Happy Coding ✌️

Working with new technologies and frameworks is part of daily life at GOJEK. We’re always trying to learn something new, and posts like this attempt to share the knowledge we gain. As we grow as an organisation, we’re also looking to hire the best in the business. Think you fit the bill? Head to gojek.jobs and find out 👍