An Architectural overview of the new GO-JEK rider app
A deep dive of everything we did on Android

By Abhay Sood
In a previous blog post my colleague, Anup, used an analogy of the GO-JEK rider app’s transformation from a caterpillar to a butterfly. This analogy is not only applicable to the design, but also our codebase, which we rewrote from scratch.
Why the rewrite?
To set the stage, here are some facts about the codebase we ditched. (This will also explain why we took it upon ourselves to rewrite the app from scratch.)
The app had three ‘Activities’, two of which were really really huge — with roughly 3000+ lines of code each. They were accompanied by their respective ‘Presenters’ of roughly 2000 lines each! And this was combined with a whole bunch of shared mutable states all around.
Internally, we mockingly termed them multi-million dollar classes of GO-JEK; because everything happened within 3 activities.
What architecture?
No reliable piece of software has survived over a long period of time without its creators being wary of architecture/design/patterns.
However, the point of this article is not to give birth to another shiny new architecture. But to demonstrate principles we followed, decisions we took and why. I hope these insights will help you when you rewrite an existing app or build a new one.
Remember: What we do in our app may or may not work for most considering the nature of our problems. Focus on structuring what works and what doesn’t. Start with the bare minimum and keep refactoring.
Our Principles
We had the following things in mind while evaluating how to structure and organize our code:
- Adhere to SOLID principles as much as possible.
- The ability to easily explain to new developers.
- No abstractions for merely making the code testable.
- Modular code with clear inputs and outputs.
- Minimum mutable global state and NO magic for mutation of this state.
We also had a single activity for the whole flow.
Why single activity?
First, by design, we show a full screen map and everything else is a card. These cards change depending on the state. Loading the map for each step would break the great work our design team put in to make the transitions between these states. Let’s look at some animations to make my point clear:

Second, there are immense benefits of having just one activity, e.g.
- Easy to make delightful transitions as you are in control of all the views.
- You are forced to think about breaking down code in smaller pieces.
- Easier life cycle to deal with. And when Jake Wharton suggests something you better listen. 😝
If we were taught that an Activity is *solely* for rendering application state into the view system then would anyone complain about lifecycle? I don't know why we continue to put anything but rendering code into activities.
— Jake Wharton (@JakeWharton) November 22, 2017
Overview
The whole app is divided into multiple small, self-contained Components. Components let you split the app into independent, reusable pieces, and make you think about each piece in isolation (it’s exactly the same as the definition of a Component in React).
To have a clear picture of how things are organized, let’s have a birds eye view of the Rider App:
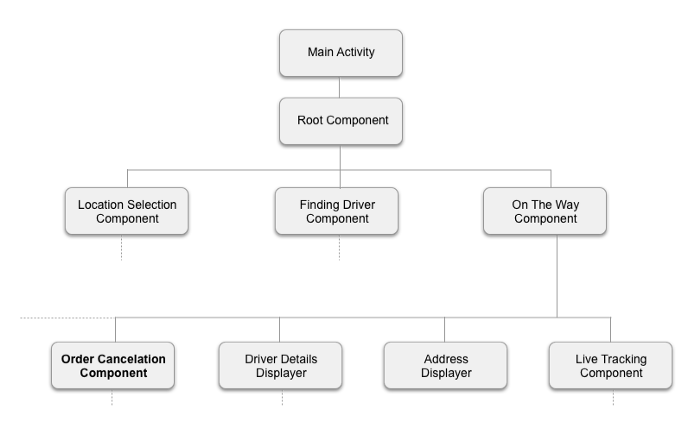
To explain how these components work, let’s take an example of a very simple Component; Order Cancellation Component. It’s created when a user clicks on the ‘Cancel order’ button anywhere in the app. It’s responsible for showing a confirmation dialog, and actually cancels the order as soon as the user confirms.
I’ll use this example as a reference to showcase some of the fundamental properties of a Component. If you feel the need to refer to code, you can check this gist. For now you can read on:
Properties of a Component
Can contain both UI and business logic
Components do not force any separation between the Android framework and business logic.
So basically, everything is a Component.
A Component can be responsible for rendering a specific view such as AddressDisplayer, DriverDetailsDisplayer. Or, it can be responsible for handling a complete logical piece of work like OrderCancellationComponent. Or, it could be a class that just takes care of animating a particular view on the screen. Or, it could be a class with no Android framework involved like a CurrencyFormatter.
This approach of keeping UI and logic in one class is contrary to what many would call the “recommended way”. The whole point of this separation in any architecture is to make testing easy. However, that’s not the only way. We’ll discuss more about testing in the Unit Testing section towards the end of the blog.
Has a single, well defined responsibility
The most important property of a Component is it should do just one thing. Nearly all Components in our app are currently about 100 –120 lines. When a Component starts getting bigger, we break it into more Components.
We currently achieve this by aggressively refactoring our code after every feature is built. We’d love to have some tooling around it, but haven’t given it much thought and are open to ideas.
Has explicitly defined inputs
A component takes all its inputs via the constructor. Specifying, the necessary inputs in the constructor ensures some compile time safety by guaranteeing that we have all values available before creating the Component.
Another advantage of explicit inputs is that during testing, we can mock these dependencies easily and test the component in isolation. That’s Dependency Injection(DI) 101.
For example, in the OrderCancellationComponent, all we need is the Order Number, a retrofit interface Api and Context to show a dialog.
class OrderCancellationComponent(private val context: Context,
                                 private val api: Api,
                                 private val orderNumber: String)
We do not use a DI framework yet. We’re currently evaluating Kodein and Koin.
Now let’s see how these Components come together and allow the users to navigate through the app.
Communication between Components
Components are organized as a tree. (as shown in the diagram before). So they can have just two ways to communicate.
- Parent to child — A parent Component can keep a direct reference to the Components within it; hence, it can simply call the public methods.
- Child to parent — A child Component never keeps a reference to its parent. The only way to communicate to a parent is via callbacks. The parent Component can register to callbacks and do what it needs to.
In our example, OrderCancellationComponent exposes two callbacks for its parent to implement which ones are self-explanatory.
interface Callbacks {
    fun onOrderCancelledSuccessfully()
    fun onOrderCancellationFailed()
}
Navigation
It’s probably the hardest task you’ll face while building a single activity app. This is also one of the things which makes Fragments so hard to work with.
It’s hard to find a one-size-fits-all solution even within a single app because:
- Navigation is deeply tied with business logic.
- Pressing back doesn’t always take the user to the previous step in the real world. So just having a simple back stack doesn’t work.
- Managing the back stack in isolation from the rest of the code leads to situations where there is no way to infer where to go next. This becomes worse if you have a nested flow with steps that can repeat, or can be skipped.
After going down the rabbit hole of trying to create a magical app wide back stack management solution, we settled with the simplest approach we could think of, even though it doesn’t look as pretty as the ones we tried earlier.
In a nutshell, we don’t maintain a back stack. We take advantage of the tree like structure of components and their self-contained nature.
So if a component needs to do something when ‘back’ is pressed, it exposes a public method with the following signature. (This method is invoked by its parent component.)
fun onBackPress() : UnitThe Component simply performs whatever action it needs to take when this method is called. In case it needs to communicate the result of a back press to its parent, it does that via the callbacks we discussed above.
Unit Testing
Components do not force any separation between the Android framework and business logic.
We do not believe in “completely” isolating business logic from the framework and adding unnecessary abstractions to achieve the isolation. It’s a topic very well covered by DHH in his blog about Test Induced Design Damage.
A Component itself is a “unit” because it does just one thing. So we test the Component entirely — both business logic and the view. Separating out the logic and view seems to be a futile exercise and makes reading code harder. The Android framework is part of the Component and is meant to be indispensable.
To unit test our Components we use Robolectric which allows us to test our Components without isolating Android and that too on the JVM.
Testing with Robolectric can be covered in detail in a separate blog post as it’s a big enough topic.
A tribute to Kotlin
When we started the rewrite, Kotlin wasn’t a first class language in the Android ecosystem. But having tried it in a few side projects and in production for a small part of the older app, we were all in. Kotlin was definitely going to be the only language for the new codebase.
We were blown away by it’s conciseness and some great features like first class lambda support, higher order functions, immutability, data classes, IDE support and a lot lot more.
Today we have 96% of our code in Kotlin. And I must say it made the rewrite so much more fun. Thanks to the whole team at JetBrains!
Our rider app codebase at @gojekindonesia is 96% Kotlin! pic.twitter.com/9kzpwJb8hW
— Anup Cowkur (@anupcowkur) January 24, 2018
If you’ve reached this far and would like to work with us, we are hiring.