Acing 1 Million Concurrent MQTT Connections
How we reached a million long-running persistent connections in a test environment using MZBench as our load testing tool.

By Dhruv Jain
Courier is an information superhighway between mobile and server, that uses persistent connections based on MQTT protocol. It’s a project very dear to us. The scope of Courier was to build an efficient load testing system with the ability to mimic on-demand 3x production-like traffic patterns, around 1 million concurrent persistent connections, with 5000 msg/sec as send and receive rate in a test environment.
Finding the right tool
The first step towards achieving our goal was to explore if we can leverage already existing load testing tools. We started our search based on the following parameters:
1. Open-source tool
2. First-hand MQTT support
3. Fast and scalable with the ability to reach 1 million concurrent connections
4. Resource-efficient
5. Easy to run and configure different testing scenarios
We could not find any direct comparison between different tools based on the MQTT connections. Due to the time constraints, we did secondary research. Based on this article, we shortlisted few tools: MZBench, Vegeta, Locust, Wrk, and K6.
Locust workers support only QoS 0 and MZBench had first-hand MQTT support maintained by the Vernemq team. Others are majorly used for HTTP requests and do not have MQTT support. Since we did not want to write MQTT workers from scratch keeping our deadline in check, our focus mainly shifted towards MZBench and Locust.
Based on the secondary research the following are the pros and cons of MZBench and locust.
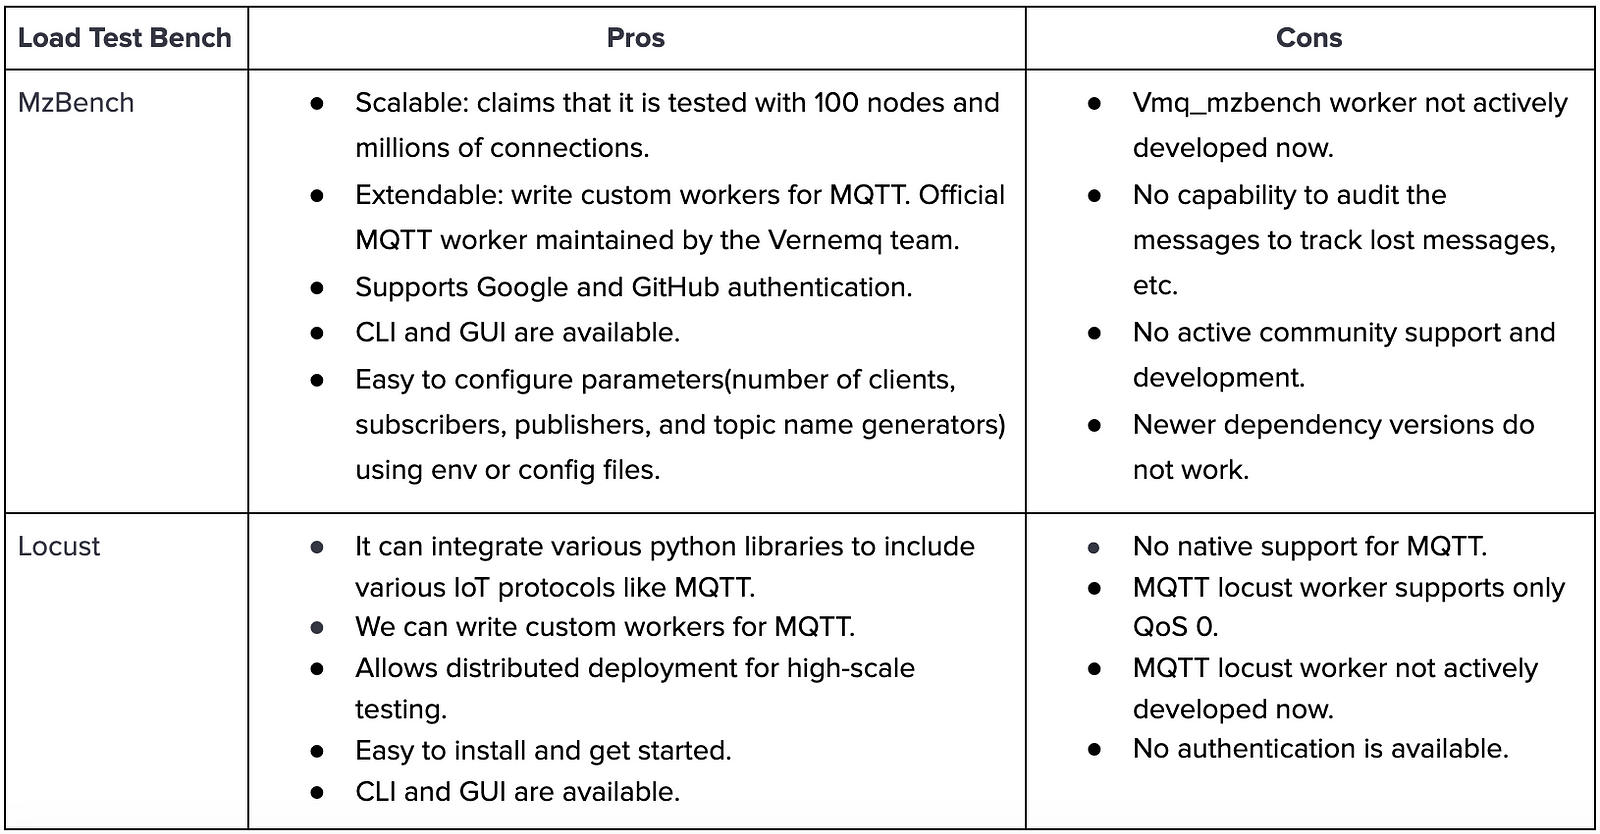
Since we were using Vernemq brokers and MZBench is a recommended testing tool by Vernemq so we were inclined more towards MZBench.
Using MZBench
The initial MZBench setup was quite hard but we were able to set it up finally on our local systems using Vagrant. This enabled us to know the dependency version requirements and get hands-on with the tool.
MzBench has 3 main components — server, workers, and director. MzBench server provides the UI, runs the scenarios, allocates and provisions nodes (workers + director), and distributes the jobs. The workers perform the job and generate the load on the target system under test. The director node does not perform the job (scenario) but collects the metrics from the worker nodes and runs post and pre hooks. The director node then passes the data to the server which uses it to render graphs and show stats.
Our setup
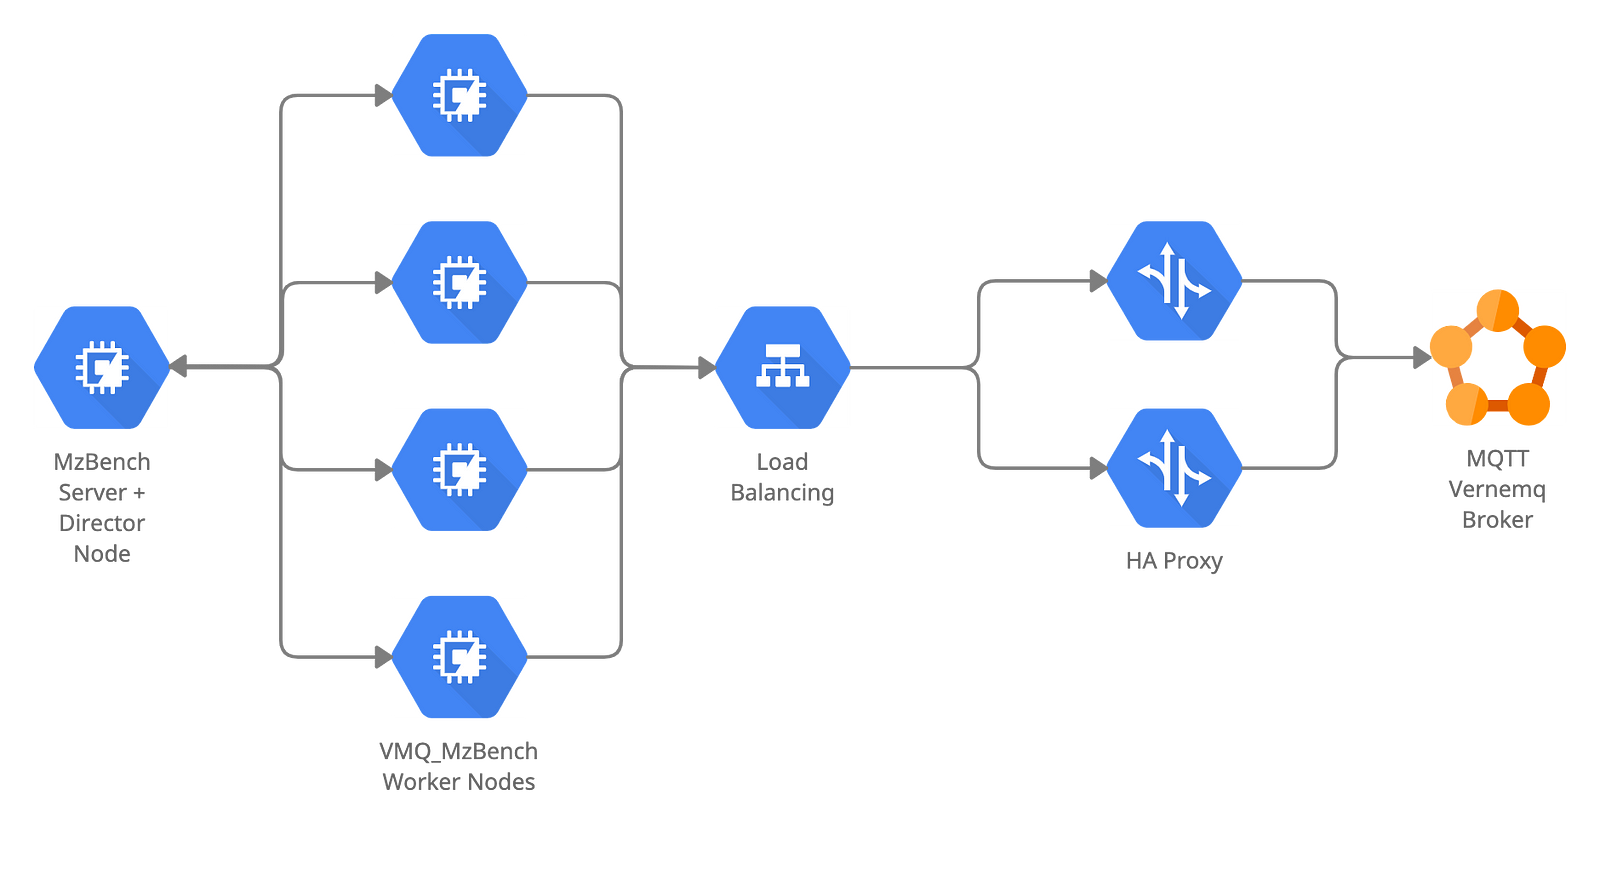
We used vmq_mzbench as our MzBench worker tool and static cloud plugin as our plugin configuration to allocate nodes from the static pool of machines.
During this journey, we faced a lot of issues in terms of configuration, networking, resources, etc.
And setting up Grafana dashboards early was the key in detecting these problems.
In the next 5 minutes, I’ll be walking you through our approach and the challenges we faced to achieve our goal.
Activity 1
The first step was to experiment & measure the capacity of one worker VM so as to estimate the infra requirement. We provisioned two n1-standard-2 GCP VMs (2 vCPU and 7.5GB RAM machines), one for the server and the other for the worker + director combined.
In case of single host available MzBench will put the director and worker at the same node, in case of multiple nodes — it will try to separate them.
We reached a max of 10k connections (9k publishers and 1k subscribers) that could run for 10 mins with publish rate of 9k messages per second on one topic with QoS 1.
NOTE:
- We saw a significant loss of messages as 1k subscribers weren’t able to receive messages at such a high rate.
- We were subscribing and publishing to a single topic.
Activity 2
The previous activity helped us know that the publish rate generation won’t be any kind of blocker given our requirements. This time we wanted to estimate the maximum number of concurrent clients that one worker VM can support. Since in the previous activity we noticed the loss of messages, this time we not only wanted to maximize the clients but also keep the publish rate constant and track lost messages, so we used n1-standard-4 GCP VM (4 vCPU and 15GB RAM machine).
We saw an increase in the number of consumed messages for the same scenario (9k pub, 1k sub, 9k msg/sec publish rate, QoS 1).
In terms of maximizing the number of connections so that we do not hit the CPU and memory limits early, we kept only 2 subscribers subscribed to the topic on which all the publishers were publishing. We hit the 28.2k connection limit post which we saw an eaddrinuse error and CPU usage hitting 100%.
Blocker: By default on a typical Linux system, there are 28232 free outgoing ports.
Solution:sysctl net.ipv4.ip_local_port_range="1024 65535"
Ideally, we should be able to create 64511 concurrent connections. We tried but we encountered an error at 40000concurrent connections. This time the error was related to EMFILE.
Blocker: OS denied the program to open more files/sockets.
Solution: Increase the open file limit by updating /etc/security/limits.conf.
We not only increased the open file limits here but also nproc limit to 150000. We finally reached ~64k connections, the maximum connections one can achieve using single static source IP and constant target IP and port.
Activity 3
After a successful activity of finding the limits on one worker VM, we shifted our focus towards achieving 1 million connections by adding more resources. In the previous activity, we noticed that the %CPU utilization and memory consumption was quite low on n1-standard-4 machine. We decided to provision n1-standard-2 VMs for workers as well.
The infra setup (1 server, 1 director, 5 worker VMs) would have the capacity to reach 324000 connections, but since we wanted to reach 350000 connections we would require one more worker VM. During the last two activities, we closely monitored the server VM utilization info which kept below 15% CPU and 1% memory utilization. We wanted to use the resources to the fullest capacity to keep the costs low. We applied a hack by setting the server VM as the last VM in the static list of VMs. This enabled the MzBench server to allocate server VM as the director node and save us the cost of 1 worker VM and help utilize server VM fully as both director and API server.
Going ahead, we did not face any issue on the MzBench side and it worked seamlessly.
Problems faced on target setup under test
At 113000 connections, we again faced port exhaustion issue but this time it was on HA proxy due to which we got etimedout error. Next, we faced another blocker around 362000 connections due to Vernemq listener capacity. We increased the number of listeners to 4. We now expected to reach 1 million. But we faced another blocker on the HA proxy maxconn limit due to which we were limited to ~710000 connections.
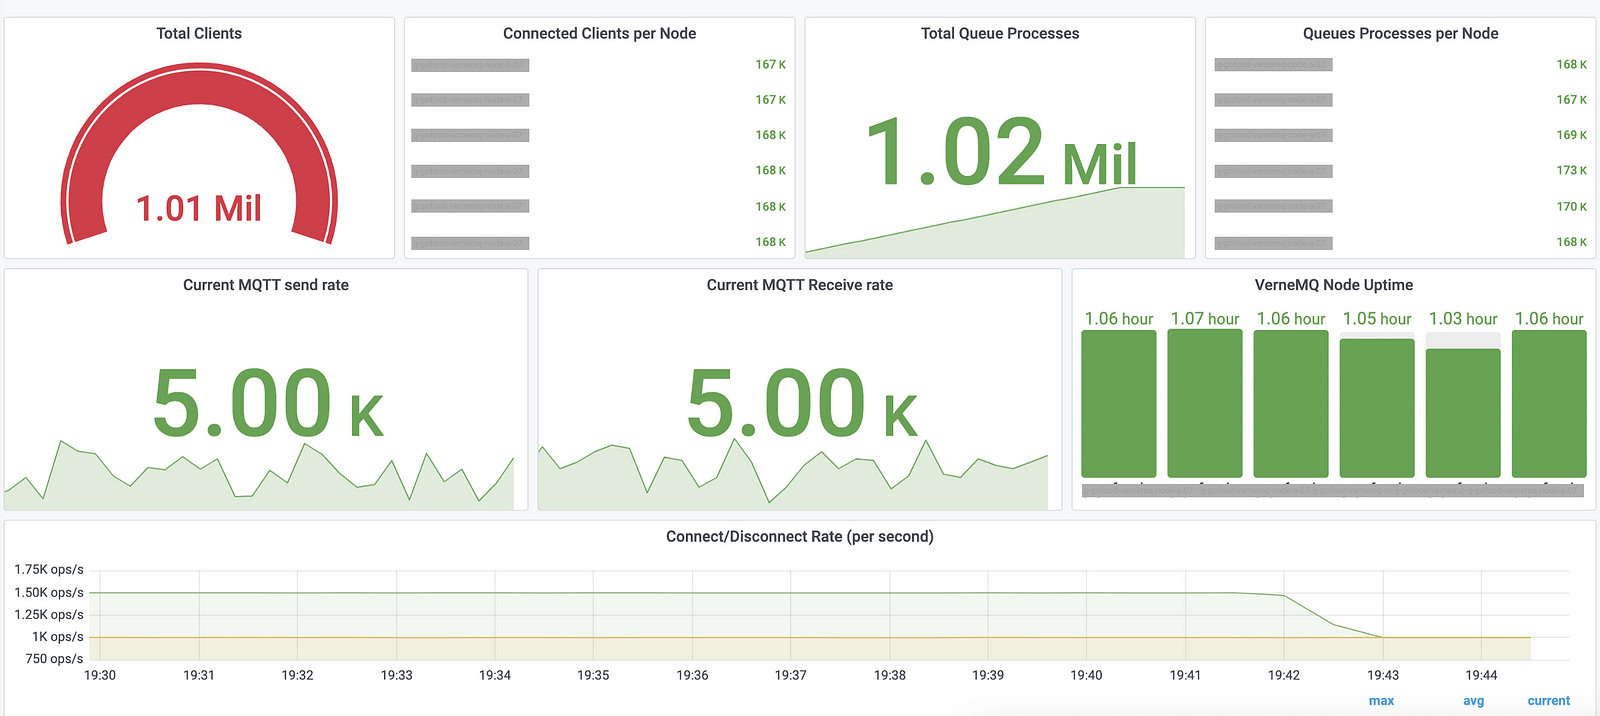
Finally, we reached 1 million connections without connect drop, 4680 messages/sec publish rate and 1000 rps connect/disconnect rate when publishing starts.
Impact & Benefits
Knowing the right configurations beforehand when starting at scale is impossible until you hit the limits and break the walls. This effort enabled us to figure out the configuration adjustments that we needed to handle our production load.
We were also able to find out unexpected bottlenecks in terms of performance issues when Vernemq webhooks were enabled. Hence, it helped in identifying inefficient code. We were also able to do capacity planning and know the areas of optimization both in terms of cost and performance.
Earlier we were testing in a naive way by directly using the paho client that required a lot of manual dev effort in terms of developing, deploying, and testing. This effort not only helps us reduce dev effort but also cuts down the test infra costs by 50% and the time required for simulating a scenario from 1.5hr to 30 mins.
All in all, it was the result of the effort put in by the team over the past few months. We hope that this blog will help you expedite in reaching beyond a million MQTT connections. Do watch out for this space to learn about interesting updates and experiences by GoTroops.

Find more stories from our vault, here.
Also, we’re hiring! Check out open job positions by clicking below: